")
I found various 2 ft. antique ceiling tile on a junking trip and
wondered what I could create, alas a butterfly!
")
We traced our pattern on the metal and Honey cut this one
out using a cutting torch.
")
I used a steel brush in my drill and proceeded to remove all the old paint.
")
I used Krylon Spray Paint Primer to prep the surface for painting.
As you can tell, this is a different tile. I forgot to take a photo
of this step![]()
")
I place the chair leg body on the table and lay the butterfly body
with the front side down. I drill a pilot hole for the hanger and screw.
")
I used #8×3/4” multi purpose lath screw. The work really
well with metal or wood.
")
Next, we drill holes for the antennas. You can use any type of
wire and shape them however you like.
")
You will need to drill pilot holes for the eyes so that the wood
doesn’t split.
")
Drill another pilot hole at the end of the body to add a little
bling bling on the tail!!

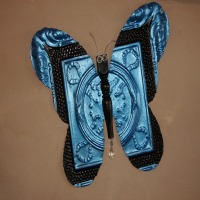
Metallic Blue and Black Butterfly made from antique ceiling tile.

Red and Black Butterfly made from antique ceiling tile.
I have showed you two different types of tin because you never
know what style you might find. One is blue and black, the other
is red and black. I sealed both with Krylon Clear Satin Sealer.
These butterflies are perfect for inside or outside use.
I hope you enjoyed this tutorial!!


3 Responses to Morphing Antique Tile into a Butterfly!
Miriam Illions says:
Tina! Congrats in your blog! Is it new?? What a wonderful post! I am blown away by your talent and honored to be an early follower.
Karen Young says:
So happy to track you on your new blog.
Jessica Serrano-Gregg says:
I know this is an old post but I saw it on HomeTalk today and I’m in love with this. Do you sell these?
I’m looking for some to create windchimes for a memorial of my niece whom loved butterflies and wanted to make these for her mom and dad so every time they hear it “chime” they’d know Lauren is with them. All need is them cut. I can paint! Please? Pretty please? Something about these struck me as so unique and excatly what I pictured but could never find or duplicate it. At any rate, you took something that was destined to degrade, slowly…. If ever… Out of the landfill and created something so beautiful and whimsical. Really, I must have these! Lol